Are you ready to submit your next release with us? In this post, we’ll go through this process step-by-step to help you prepare before you dive in head first. Ready to get started? Here’s every bit of information you’re going to need right here.
How To Input Your Metadata in the SMS
Where To Begin…
To get started, log in to the SymphonicMS. Next, click the Create Release button or select Create Release under the Distribute drop-down.
 Step 1) Create Your Release
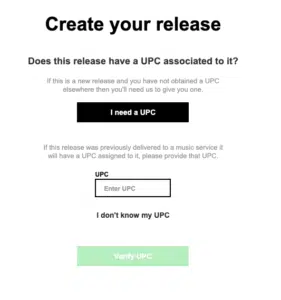
First, we need to know if your release already has a UPC associated with it. If it doesn’t, select the I need a UPC button. If the release has a UPC, enter the UPC in the field and select Verify UPC. After validating, we can assist with populating your release with as much information as we can find.
- If you don’t know your UPC, you can select I don’t know my UPC, where you will be prompted to enter the Spotify Album URL. If you’re transferring your catalog to Symphonic, please check out our TransferTrack tool and additional helpful resources here before moving on to step 2.
Step 2) Release Details
This is information that pertains to the overall release and does not include any track information. Information in this section includes:
- Release Name
- Release Version
- English Translation
- If your release is in another language, this field is where you can enter English Translations. (If you do not want your content to display in English, do not enter English Translations.)
- Catalog #
- This is any classification number for this release in your catalog. The most common format is the abbreviated label name followed by the number of release it is. Alternatively, you can use the one automatically generated. Once audio files are uploaded, this field will not be able to be edited again.
- UPC
- A UPC is a Universal Product Code and is similar to a barcode or serial number.
- Compilation
- If your release is a compilation, select Yes. Here’s a brief guide to help you determine if your release is considered a compilation.
- Number of Tracks
- Various Artists
- Artist Name
- If you do not see your artist in the drop-down list, you can add their name by typing it and clicking Create this Artist.
- You can also edit or add the artist’s name under Distribute ► Artists to set up their profile. To be certain that the artist’s name is aligned to the correct artist page, check out our article on setting up your artist profiles in the SymphonicMS.
- Label Name
- Primary Genre
- Secondary Genre
——
Sorry to interrupt… 😉
How To Submit Accurate Metadata
6 Symphonic Tech Features You Should Be Using in 2023
How To Access Our YouTube Analytics Feature in the SMS
——
- Language
- Release Pricing Tier
- Copyright Year and Owner
- Sound Recording Copyright
- Upload Cover Artwork
- Click browse and select the artwork stored on your computer or device you wish to use as the Single/EP/Album Cover Art. Art must be SQUARE and at least 3000 x 3000 pixels at 72 dpi (300 dpi is recommended) in a 1:1 square image and CANNOT be blurry or pixelated. Be sure to view our full cover art specifications.
Step 3) Songs and Audio
In this part, you can provide information for each track, including the audio files. In Step 2, you should have selected the number of tracks needed for the release, so you should see the number of blank tracks listed here for editing.
✨ Note: It is important to save often when editing tracks to prevent loss of information, especially with multi-track releases.✨
In this section, here’s what you’ll find…
- Bulk Upload Audio Files (optional)
- If you have multiple tracks on the release, you can upload audio for all of the tracks from the main view tracks screen by clicking on the icon for your preferred upload method. Once uploaded, the files are loaded into our system to be selected later using drop-down menus.
- Edit Track
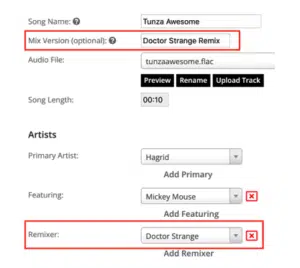
- Song Name
- Audio File
- Song Length
- Clip Start Time (optional)
- The clip start time field informs TikTok the time in which you want your clip to start on their platform. The duration of the clip we send to TikTok is 60 seconds long. For a full TikTok overview, click here.
- Primary Track Artist
- Featuring Artists
- Check out the full guidelines on featuring artists here.
- Remixer

Contributors
-
- Each track must include at least one Writer contributor (fill out either the Composer, Lyricist, or Songwriter field). The legal first and last name of these contributors is required when submitting these roles. These roles should not use stage names, aliases, or alternate performer names unless such a name is the person’s actual name, such as a singer/songwriter artist. For more details, click here.
- Primary Genre
- Secondary Genre
- Choose the sub-genre that more specifically categorizes the track. The secondary genre options will change based on which primary genre is selected. If your genre is not listed, select the genre that most closely matches your preferred genre.
- Recording Year
- ISRC Code
- The ISRC code or international standard recording code is a series of numbers used to identify a specific recording version of a track.
- If this is a new track, you can select Generate ISRC code, and we will provide you with a code.
- If you already have a code or are re-releasing the track in an album, you can input your code in the field.
- Does this song contain vocals?
- Language of vocals
- Lyricist
- Lyrics
- Explicit Status
Step 4) Stores and Partners
During this final step, you will select the partners (stores) that the release will be sent to and when it will go live. This section includes things like your release date, time, territory and more. In addition, you’ll see a section for Selecting Partners.
- In this area, use the pre-made lists at the top to select different sets of partners or select all partners. Alternatively, you can scroll through the partner list and pick each partner you wish to send to.
- Be sure to check that all desired partners are selected on this step.
Once done, save your release before continuing to the final review. If a partner is showing Unavailable, you can hover over the partner for a reason as to why the release cannot be submitted there.
Step 5) Submit Final Review
Once you have completed all four steps, you can proceed to a final review of the release! Next, all you have to do it click Submit, and you’ll see all of the details for the release one last time. When you’re ready, click the Submit button at the bottom of the final review to submit your release for delivery.
Congratulations, you’re finished with creating your release!
——
Still got a question?
If you have any questions, please visit our Help Desk.
Good luck!
🔥


